#!/bin/bash
# #selinux配置#
setenforce 0
grep -iE 'SELINUX=enforcing' /etc/selinux/config ; [ $? -eq 0 ] && sed -i 's/SELINUX=enforcing/SELINUX=disabled/g' /etc/selinux/config
getenforce
# #防火墙 iptables 配置#
iptables -F
/etc/init.d/iptables save
iptables -vnL
# #精简开机自启动服务, 刚装完操作系统可以只保留crond,network,rsyslog,sshd这四个服务。(Centos6.7为rsyslog)此命令本人没经过测试,请慎用#
#for i in `chkconfig --list|grep 3:on|awk '{print $1}'` ; do chkconfig --level 3 ${i} off ; done
#for j in crond rsyslog sshd network ; do chkconfig --level 3 ${j} on ; done
#chkconfig --list|grep -iE "3:on"
# #去除系统及内核版本登录前的屏幕显示#
>/etc/redhat-release
>/etc/issue
# #删除无用的用户和组#
chattr -i /etc/passwd /etc/shadow /etc/group /etc/gshadow /etc/inittab
for i in `awk -F : '{print $1}' /etc/passwd | grep -Ei 'adm|lp|sync|shutdown|halt|news|uucp|operator|games|gopher'` ; do userdel ${i} ; done
for j in `awk -F : '{ print $1 }' /etc/group | grep -Ei 'adm|lp|news|uucp|games|dip|pppusers|popusers|slipusers'` ; do groupdel ${j} ; done
# #口令文件加锁,当需要改密码的时候,要先解锁shadow文件: chattr -i filename#
chattr +i /etc/passwd /etc/shadow /etc/group /etc/gshadow /etc/inittab
lsattr /etc/passwd /etc/shadow /etc/group /etc/gshadow /etc/inittab
# #删除多余登录终端#
sed -i -r -e '/^tty[2-9]|^tty1[0-1]/ s/^/#/g' /etc/securetty
cat /etc/securetty
# #调整文件描述符大小#
ulimit -n
sed -i -e '/^* - nofile/d' -e '/^#* - nofile/d' /etc/security/limits.conf ; sed -i -e '$a\* - nofile 65000' /etc/security/limits.conf
tail /etc/security/limits.conf
# #修改内核网络相关参数,慎用,另,请在Linux系统安装完后执行此命令#
[ -n "`grep -iE "max_tw_buckets|tw_recycle|syn_retries|backlog" /etc/sysctl.conf`" ] || cat >>/etc/sysctl.conf <<END
#########################
net.ipv4.tcp_syn_retries = 1
net.ipv4.tcp_synack_retries = 1
net.ipv4.tcp_keepalive_time = 600
net.ipv4.tcp_keepalive_probes = 3
net.ipv4.tcp_keepalive_intvl =15
net.ipv4.tcp_retries2 = 5
net.ipv4.tcp_fin_timeout = 2
net.ipv4.tcp_max_tw_buckets = 36000
net.ipv4.tcp_tw_recycle = 1
net.ipv4.tcp_tw_reuse = 1
net.ipv4.tcp_max_orphans = 32768
net.ipv4.tcp_syncookies = 1
net.ipv4.tcp_max_syn_backlog = 16384
net.ipv4.tcp_wmem = 8192 131072 16777216
net.ipv4.tcp_rmem = 32768 131072 16777216
net.ipv4.tcp_mem = 786432 1048576 1572864
net.ipv4.ip_local_port_range = 1024 65000
net.ipv4.ip_conntrack_max = 65536
net.ipv4.netfilter.ip_conntrack_max=65536
net.ipv4.netfilter.ip_conntrack_tcp_timeout_established=180
net.core.somaxconn = 16384
net.core.netdev_max_backlog = 16384
END
sysctl -p
tail /etc/sysctl.conf
# #设置用户登录空闲超时时间,此处是7200秒,可根据实际情况而定,注销用户,再用该用户登录激活该功能#
sed -i -e '/^#export TMOUT/d' -e '/^export TMOUT/d' /etc/profile ; sed -i -e '$a\export TMOUT=7200' /etc/profile
# #设置用户历史命令行保留数目100#
sed -i -e '/^#HISTSIZE/d' -e '/^HISTSIZE/d' /etc/profile ; sed -i -e '$a\HISTSIZE=100' /etc/profile
# ssh服务端设置
#禁用root登录 permitrootlogin no#
\cp -f /etc/ssh/sshd_config /etc/ssh/sshd_config.bak
sed -i -e '/^#PermitRootLogin/d' -e '/^PermitRootLogin/d' /etc/ssh/sshd_config ; sed -i -e '$a\PermitRootLogin no' /etc/ssh/sshd_config
#添加允许登录的用户 allowusers pc#
sed -i -e '/^AllowUsers/d' -e '/^#AllowUsers/d' /etc/ssh/sshd_config ; sed -i -e '$a\AllowUsers pc' /etc/ssh/sshd_config
#使用protocol 2协议#
sed -i -e '/^Protocol 2/d' -e '/^#Protocol 2/d' /etc/ssh/sshd_config ; sed -i -e '$a\Protocol 2' /etc/ssh/sshd_config
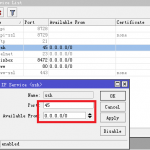
#修改端口为50218,或者你指定的端口,最好大于30000#
sed -i -e '/^Port/d' -e '/^#Port/d' /etc/ssh/sshd_config ; sed -i -e '$a\Port 50218' /etc/ssh/sshd_config
#重启sshd服务#
service sshd reload
# #升级openssh服务端,加固安全,upgrade openssh#
#检测ssh版本,如果已经是7.2p2版本,请不要执行升级#
ssh -V
#1 安装openssh软件的所需依赖包#
yum -y install telnet telnet-server openssl openssl-devel zlib zlib-devel pam-devel
#2 配置telnet服务以便于卸载老版本openssh后的远程连接
sed -r -i -e ‘/disable/ s/yes/no/g’ /etc/xinetd.d/telnet
## 启动telnet服务
service xinetd start
##暂时不退出ssh连接,一般升级的时候不会断开ssh连接,建个Telnet服务只是以防万一。
#3 卸载就openssh以及相关依赖包
rpm -e --nodeps --allmatches `rpm -qa|grep openssh`
#4 官网下载openssh最新版本,目前(2016-07)最新的是7.2p2到/tmp目录,wget方式官网下载速度有点慢,建议先用浏览器下载
#wget -c -P /tmp http://openbsd.cs.toronto.edu/pub/OpenBSD/OpenSSH/portable/openssh-7.2p2.tar.gz
wget -c -P /tmp https://peloo.net/download/openssh-7.2p2.tar.gz
#5 编译安装openssh
cd /tmp/
tar zxvf openssh-7.2p2.tar.gz
cd openssh-7.2p2
./configure --prefix=/usr --sysconfdir=/etc/ssh --with-zlib --with-ssl --with-md5-passwords --mandir=/usr/share/man --with-pam
make && make install
## 复制启动文件到/etc/init.d
\cp -v contrib/redhat/sshd.init /etc/init.d/sshd
chmod +x /etc/init.d/sshd
chkconfig --add sshd
chkconfig sshd on
#6 为了安全起见,建议配置不允许root登陆,注意提前建立Linux用户
sed -i -e '/^PermitRootLogin/d' -e '/^#PermitRootLogin/d' /etc/ssh/sshd_config ; sed -i -e '$a\PermitRootLogin no' /etc/ssh/sshd_config
service sshd restart
ssh -V